

The image of a professional chef tossing a thick ribeye into a screaming-hot, smoking cast iron skillet is burned into our collective culinary consciousness. We have been told for decades that high heat is the only way to achieve a world-class crust. We have been told that if the kitchen isn’t filled with smoke and the fire alarm isn’t screaming, we aren’t doing it right. This traditional approach treats the sear as an act of violence against the meat. However, for the home cook working with a standard kitchen vent and a premium cut of beef, this method often leads to heartbreak. You end up with a charred exterior and a thick, rubbery grey band of overcooked protein that robs you of the edge-to-edge pink perfection you see in high-end steakhouses. It is time to retire the smoke alarm and embrace a more scientific, precise tool for your kitchen.
The cold sear steak method challenges the most sacred rule of steak cookery by starting with a cold pan. This is not a shortcut or a hack for beginners; it is a sophisticated application of thermodynamics that prioritizes the integrity of the muscle fibers. When you throw a cold steak into a white-hot pan, the surface proteins contract so violently that they squeeze out the internal juices. This creates a barrier of steam that actually prevents a uniform crust from forming initially. By starting cold and gradually increasing the temperature, you allow the steak and the pan to rise in harmony. This gradual transition facilitates a deeper, more even Maillard reaction while keeping the internal temperature under strict control.
Challenging the High-Heat Myth: Why You Should Stop Preheating Your Pan
The primary argument for the high-heat sear is the Maillard reaction. This is the chemical dance between amino acids and reducing sugars that gives browned food its distinctive flavor. Conventional wisdom suggests that you need immediate, intense heat to trigger this reaction before the inside overcooks. This logic is fundamentally flawed when applied to thick-cut steaks in a home environment. A screaming-hot pan creates a surface temperature that far exceeds what is necessary for browning, leading to carbonization and bitterness rather than a rich, savory crust.
When you preheat a pan to the point of smoking, you are working in a range where fats break down into unpleasant compounds. You are also creating a thermal shock that causes the meat to curl and buckle. This lack of flat contact with the pan actually hinders the very sear you are trying to achieve. Learning how to sear steak in cold pan settings allows the meat to remain relaxed and flat against the iron. As the temperature climbs, the meat stays in constant contact with the heat source. This results in a crust that is more uniform and much thicker than what you get from a thirty-second blast of high heat.
The Physics of the Cold Sear: How Gradual Heating Prevents Overcooking
To understand why this technique works, we must look at the physics of thermal transfer. The goal of any great steak recipe is to manage the temperature gradient between the surface of the meat and its core. In a traditional high-heat sear, the temperature gradient is extreme. The outside reaches $400^{\circ}F$ almost instantly while the center remains at $40^{\circ}F$. This creates a massive heat front that moves rapidly through the meat, overcooking the outer half-inch before the center even begins to warm.
Understanding Heat Flux and the Thermal Gradient in Beef
We can visualize this through the heat conduction equation, which describes how temperature changes over time in a solid medium. The rate of change in temperature depends on the thermal diffusivity of the beef, represented by $\alpha$.
By utilizing the cold sear steak method, you are essentially lowering the intensity of the thermal attack. Because the pan and the steak heat up together, the thermal diffusivity works in your favor. The heat moves into the meat more gently, preventing the outer layers from reaching the point of carbonization. This allows the intramuscular fat, the marbling, to render into a liquid state long before the proteins become tough. The result is a steak that is significantly more tender because you haven’t shocked the cellular structure of the beef.
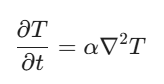
Selecting the Best Tool: Why Heavy Cast Iron or Carbon Steel is Essential
Your choice of cookware is the primary variable in this equation. While a thin aluminum or non-stick pan might seem convenient, they lack the thermal mass required to sustain a proper sear. Finding the best pan for cold sear applications requires looking for something with significant weight and density. A heavy cast-iron or carbon steel skillet is not just a piece of metal; it is a thermal battery. It excels at holding and distributing heat evenly. In this context, the cast iron acts as a buffer. As the burner heats the iron, the iron slowly transfers that energy into the steak.
The seasoning on your cast iron also plays a critical role here. That layer of polymerized oil provides a micro-textured surface that prevents the meat from sticking while allowing the rendered beef tallow to circulate under the steak. As the pan reaches the $300^{\circ}F$ to $350^{\circ}F$ range, you are essentially confitting the steak in its own fats. This is why highly marbled cuts like a Ribeye or a Wagyu-cross New York Strip are the perfect candidates for this tool. The fat renders out, becomes the cooking medium, and fries the surface of the steak to a mahogany brown that is impossible to achieve with a dry high-heat sear.
The Complete Cold Sear Protocol for Flawless Edge-to-Edge Pink
The execution of the cold sear requires patience and attention to detail. It is a more involved process than the set-it-and-forget-it nature of the traditional sear, but the rewards are evident in every bite. This protocol ensures that you are managing the moisture, the heat, and the protein structure at every stage of the cook. If you follow these steps, the cold pan steak results will speak for themselves in the form of a juicy, perfectly cooked centerpiece.
Preparing the Surface: The Science of the 24-Hour Dry Brine
The process begins long before the pan touches the stove. You must dry-brine your steak. Salt the meat liberally on all sides at least four hours before cooking, though twenty-four hours is ideal. Leave the steak uncovered on a wire rack in the refrigerator. This allows the salt to penetrate the deep tissues and, more importantly, it dries out the surface of the meat. Moisture is the enemy of the Maillard reaction. If your steak is wet when it hits the pan, the energy of the stove will be wasted on evaporating that water rather than browning the beef. A dry steak will begin to sear the moment the pan reaches browning temperatures.
The Active Cooking Phase: Mastering the Two-Minute Flip Technique
When you are ready to cook, place the cold, dry steak into your skillet. Do not add any oil or butter at this stage. Turn your burner to medium-high. Many people feel an instinctual urge to walk away and let the steak sit, but this technique requires active participation. You should flip the steak every two minutes. This constant rotation is the secret to the edge-to-edge pink result. By flipping frequently, you ensure that neither side of the steak absorbs too much heat at once. You are effectively basting the interior of the meat with the heat from the pan, using the exterior as a heat shield that never gets hot enough to overcook the underlying muscle.
Reaching the Target: Internal Temperature Guides for Every Doneness
As the pan heats up, you will hear the sound transition from a gentle hiss to a rhythmic crackle. This is the sound of the fat rendering and the Maillard reaction beginning its work. By the ten-minute mark, the steak will have developed a light golden color. By the fifteen-minute mark, that color will deepen into a rich, crusty brown. Use a high-quality digital meat thermometer to monitor the progress. For a perfect medium-rare, you are looking for an internal temperature of $120^{\circ}F$. Once you hit that number, remove the steak immediately. The carry-over heat will do the rest of the work.
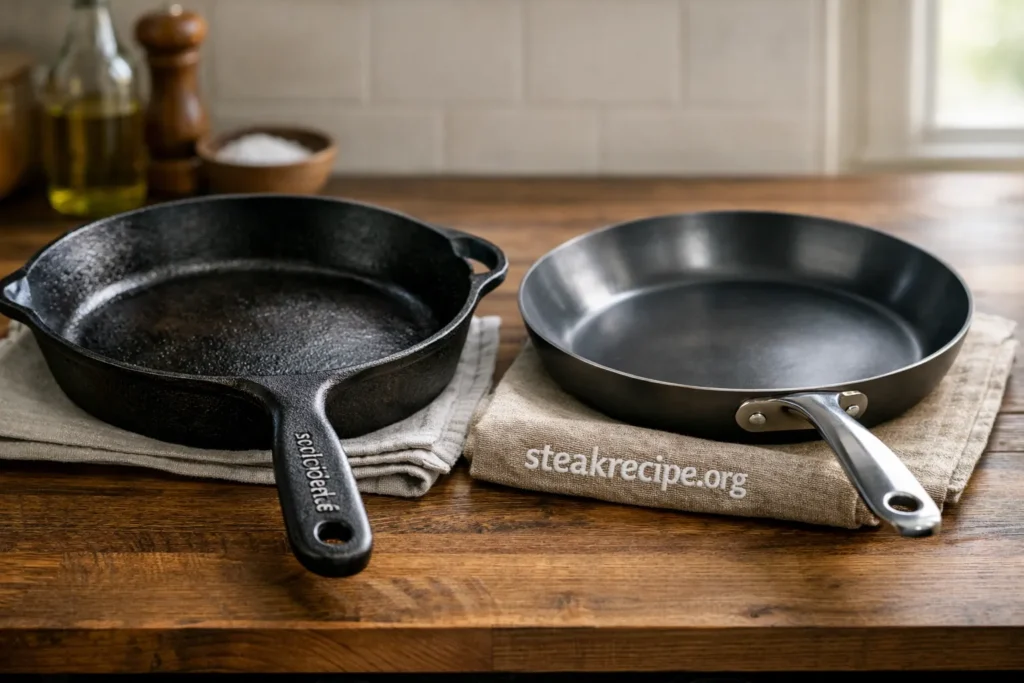
Solving the Grey Band Problem: Why Traditional Searing Fails the Home Cook
The grey band is the ultimate sign of a steak that was cooked with too much direct, unmanaged heat. It is a layer of dead meat that has been robbed of its moisture and flavor. In a traditional sear, the grey band can often account for up to forty percent of the steak’s total volume. This is a massive waste of high-quality beef. Achieving success in avoiding grey band in steak requires a fundamental change in how we think about heat. The cold sear eliminates this problem because the heat never stays on one side long enough to penetrate too deeply. Because you are flipping the steak every two minutes, the heat front is constantly being reversed. This keeps the thermal energy concentrated on the surface for browning while the center gently glides up to its target temperature. When you slice the final product, the pink spans from the very top to the very bottom.
Troubleshooting the Cold Sear: Sensory Indicators of a Professional Result
Since this is a tool-based approach, you must learn to calibrate your senses to the process. You are looking for specific visual and olfactory markers. The fat cap on a strip steak should move from a solid white to a translucent, crispy gold. If you see black char forming, your heat is too high; turn the burner down slightly and increase the frequency of your flips. The aroma should be reminiscent of roasted nuts and savory beef, not the acrid, stinging smell of burning grease. One common concern is the lack of grill marks. In the world of high-end steak science, grill marks are actually a sign of an uneven sear. A perfect sear is a solid, unbroken wall of browned crust across the entire surface of the meat. This method provides this level of contact because the meat doesn’t curl or warp as it would when hitting a hot pan.
Maximizing Satiety and Flavor: The Final Rest and Presentation
The most important part of using any tool is knowing when to stop. When you pull a steak off the heat at $120^{\circ}F$, the cooking process does not stop. The energy stored in the outer layers of the meat will continue to move toward the center. Place the steak on a warm plate or a wooden cutting board and let it rest for at least ten minutes. Do not tent it with foil, as this will trap steam and soften the beautiful crust you just spent fifteen minutes building. During this rest, the muscle fibers, which tightened slightly during the cook, will begin to relax and reabsorb the internal juices.
When you finally slice into the meat, you will see the hallmark of a master. There is no grey band. There is no wasted meat. You have used science and precision to create a steak that is better than what most high-end restaurants serve. This journey into how to sear steak in cold pan environments proves that the most powerful tool in your kitchen isn’t the heat of your stove, but your understanding of how to manage it. By focusing on the cold pan steak results rather than the theatrical smoke of a hot pan, you ensure that every dinner is a celebration of flavor and technique.
Watch the Cold Sear in Action
Lan Lam from America’s Test Kitchen demonstrates the exact 15-minute protocol for edge-to-edge pink perfection.