
The era of the limp and grey steak sear has finally come to an end. For decades, home cooks and even some professional chefs relied on industrial seed oils like canola or grapeseed to finish their beef. They chose these oils for their neutral flavors and supposedly high smoke points, yet they often wondered why their crust lacked that profound, glass-like crunch found in top-tier steakhouses. The answer lies in the molecular instability of those very oils. When you subject a polyunsaturated fat to the roaring heat of a cast iron skillet, it breaks down and creates a thin, papery surface that sogs up the moment the meat begins to rest. If you want a crust that you can actually hear when your knife drags across it, you must return to the ancestral gold of the kitchen which is beef tallow.
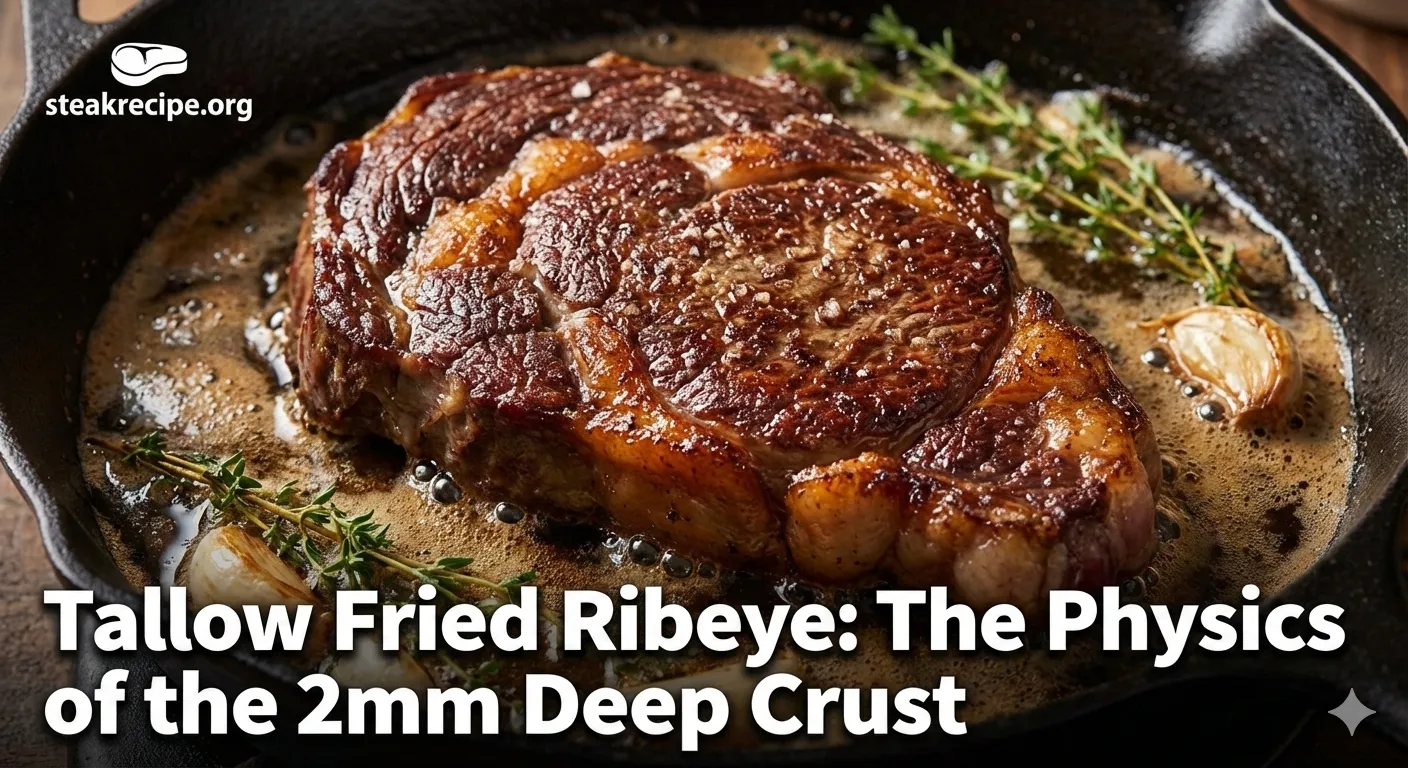
Searing a ribeye in its own rendered fat is not just a nod to tradition but a calculated move in thermal engineering. Tallow provides a structural integrity that vegetable oils simply cannot match. It creates a non-porous thermal bridge between the metal of your pan and the irregular surface of your steak. This allows the heat to penetrate deeper into the muscle fibers, building a structural wall of caramelized protein that reaches a full two millimeters in thickness. This is the secret to the ultimate steak experience.
The Tallow Advantage
Beef tallow is a highly stable saturated fat with a smoke point exceeding 420°F that creates a superior thermal bridge for the Maillard reaction. Its molecular structure resists oxidation, ensuring a clean, deep, and structural crust.
To understand why this works, you have to look at the chemistry of the fat itself. Most common cooking oils consist of long-chain fatty acids that are prone to oxidative stress. When these oils hit a hot pan, they begin to polymerize into a sticky, varnish-like substance that coats the meat rather than frying it. Tallow, being a saturated fat, remains stable at much higher temperatures. Instead of breaking down, it stays liquid and efficient, surrounding every microscopic peak and valley on the surface of your ribeye. This creates a “micro-deep-fry” effect. You are essentially shallow-frying the exterior of the steak, which results in a crust that is an integrated part of the meat rather than a separate, flimsy layer.
Sourcing the Liquid Gold: Suet Versus Trim
Your journey toward a 2mm crust starts at the butcher counter, but you must be specific about what you ask for. Many people make the mistake of rendering the soft white fat trimmed from the edges of a New York strip or a ribeye. While this fat is flavorful, it contains a higher percentage of moisture and stray protein strands that will lower your smoke point and cause the fat to splat and pop violently in the pan. For a professional-grade sear, you must use kidney fat, also known as suet.
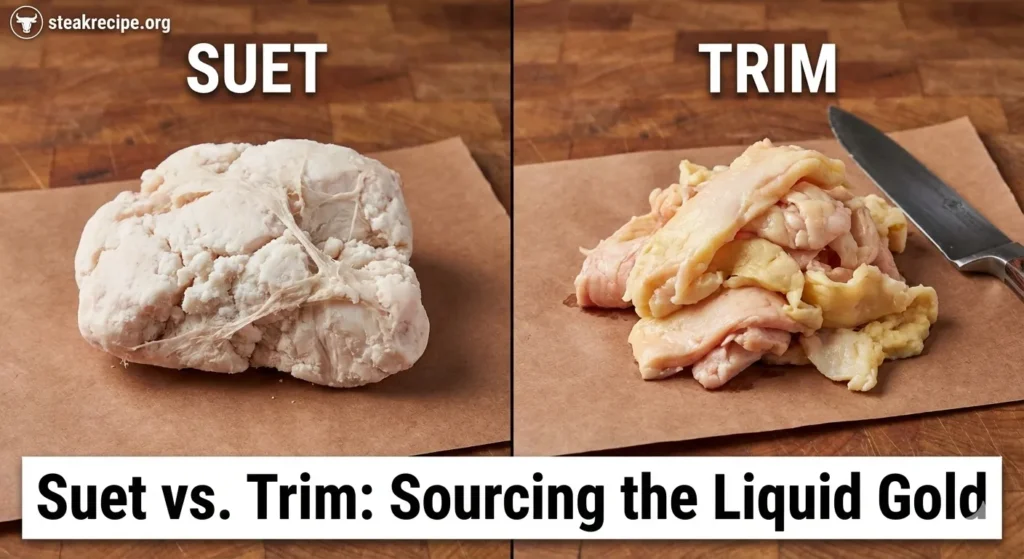
Suet is the hard, waxy fat that surrounds the internal organs of the cow. It has a much higher melting point and a cleaner flavor profile than the “intermuscular” fat found in the steaks themselves. When you render suet, you produce a tallow that is rock-hard at room temperature and incredibly stable under fire. If you cannot find suet, look for the highest quality grass-fed beef trim you can find. Grass-fed beef tends to have a higher concentration of fat-soluble vitamins and a more complex, nutty aroma that translates beautifully into the final sear.
The Rendering Masterclass
Once you have your suet, you need to render it properly to ensure absolute purity. I prefer the wet-render method because it uses water as a thermal buffer. This prevents the fat from scorching or developing a “beefy” odor that might overwhelm the natural flavor of your ribeye. Start by dicing your cold suet into tiny half-inch cubes or, even better, run it through a meat grinder. The more surface area you create, the faster and more efficiently the fat will release.
Place the fat in a heavy-bottomed pot and add about a cup of water. Turn the heat to low. As the water simmers, it gently coaxes the liquid tallow out of the cellular membranes of the suet. You will see the water slowly evaporate over the course of several hours, leaving behind a pool of crystal-clear liquid gold. Once the remaining bits of solid fat, the cracklings, turn a light golden brown and sink to the bottom, your render is complete. Strain the liquid through a triple layer of cheesecloth or a very fine mesh sieve into a glass jar. Pure tallow should look like clear water when hot and turn into a stark, snowy white solid as it cools.
The Science of the 2mm Deep Crust
Building a deep crust requires more than just high heat. You have to manage the moisture on the surface of the steak with obsessive precision. Moisture is the mortal enemy of the Maillard reaction. If there is even a hint of dampness on your ribeye when it hits the tallow, that water must evaporate before the browning can begin. This delay is what causes the dreaded “grey band” of overcooked meat beneath the surface. To prevent this, you must dry-brine your steak for at least twenty-four hours.
Apply a generous coating of kosher salt to a thick-cut ribeye and place it on a wire rack in the back of your refrigerator. Do not cover it. The cold, circulating air of the fridge acts as a dehydrator, pulling moisture out of the surface and concentrating the beef flavors inside. By the time you are ready to cook, the exterior of the steak should feel like dry parchment paper. This dry surface, when introduced to the tallow, will undergo the Maillard reaction almost instantaneously, allowing the heat to build that 2mm structural crust before the center of the steak even begins to warm up.
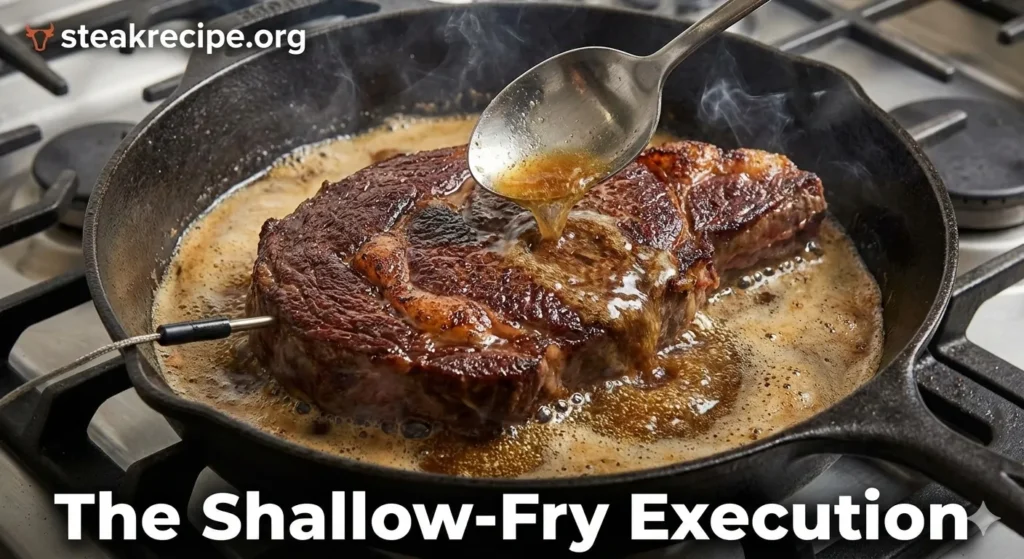
The Shallow-Fry Execution
Forget what you have heard about “just a tablespoon” of oil. To achieve a 2mm deep crust, you need a significant volume of fat. You are not just lubricating the pan; you are creating a thermal bath. Melt enough of your homemade tallow in a cast iron or carbon steel skillet to reach a depth of at least a quarter of an inch. You want the liquid fat to come halfway up the side of the steak’s crust as it sits in the pan.
Heat the tallow until it just begins to shimmer and show the first wisps of smoke. This is usually around 400°F. Carefully lay the ribeye into the pan, laying it away from you to avoid splashes. Because of the volume of the tallow, the fat will bubble up around the edges of the meat, searing the sides and the top simultaneously. This is where the “Fat Shower” technique comes into play. Take a large metal spoon and continuously bast the top of the steak with the hot tallow. This ensures that the entire exterior is cooking at a uniform rate. Unlike butter basting, which introduces milk solids that can burn and become bitter, tallow basting allows you to maintain high heat for the duration of the sear.
The Auditory Metric and the Snap Test
You will know you have succeeded not by the color, but by the sound. A butter-seared steak has a soft, muffled thud when tapped with a fingernail. A tallow-fried ribeye, however, has a distinct, metallic “snap.” This is because the tallow has polymerized with the proteins on the surface to create a literal shell. When you move the steak to a cutting board, let it rest for at least ten minutes. Many people fear that resting will soften the crust, but the structural integrity of the tallow-fry ensures that the crunch remains intact even as the juices redistribute.
As you slice into the ribeye, listen for the serrated “crunch” of the knife breaking through that 2mm barrier. You should see a stark contrast between the dark, mahogany exterior and the wall-to-wall pink of the interior. The depth of that crust provides a savory, salty counterpoint to the rich, tender fat of the ribeye cap. It is a sensory experience that defines the difference between a home-cooked meal and a culinary masterpiece.
Common Questions and the Tallow Protocol
Many people ask if tallow-frying is a less healthy option than using plant-based oils. In the world of high-heat cooking, the opposite is actually true. Because tallow is a saturated fat, it does not produce the same level of toxic aldehydes and free radicals that seed oils do when they reach their smoke point. You are consuming a more stable, less oxidized product that the human body has been processing for millennia.
Another common concern is whether you can reuse your steak tallow. As long as you did not burn the fat or leave behind a significant amount of charred protein bits, you can certainly reuse it. After your steak is done, let the fat cool slightly and then pour it through a fresh coffee filter. Store it in the freezer, and it will keep for months. Each subsequent use will actually pick up a bit more of that deep beefy essence, making your next steak even more flavorful than the last.
Finally, if you find that your crust is still coming out soggy, you likely crowded the pan or used a steak that was too thin. A thin steak will overcook before the tallow has time to build the crust. Stick to cuts that are at least an inch and a half thick. This provides the thermal inertia needed to withstand the intense heat of the shallow fry without turning the inside into grey leather.
The secret to a 2mm deep crust is not a special spice or a expensive gadget. It is the simple, honest application of beef tallow and the patience to let physics do its work. Once you experience the structural snap of a tallow-fried ribeye, you will never go back to seed oils again. You have moved beyond the recipe and entered the realm of the master griller.
Tallow Mastery: The Science of the 2mm Crust
Watch the visual evidence of how rendered beef fat creates a structural, glass-like shell that vegetable oils cannot replicate.